


In this blog we are going to see what is Kubernetes and about kubernetes cluster.
What is Kubernetes ?
Kubernetes is an open source container orchestration engine for automating deployment, scaling, and management of containerized applications. The open source project is hosted by the Cloud Native Computing Foundation (CNCF). So kubernetes is a tool that can manage the containers and monitor the container if any container goes down then kubernetes automatically launches it again in a sec without any Human Intervention. They use the concept of Replicas Controller to automatically launch the pod. So there are many resources in Kubernetes which have their own role. Some resources are RC, RS , POD,SERVICE, SECRET, PVC,DEPLOYMENT ETC.
Kubernetes Cluster
A Kubernetes cluster is a set of node machines for running containerized applications. If you’re running Kubernetes, you’re running a cluster. At a minimum, a cluster contains a control plane and one or more compute machines, or nodes. As we know kubernetes run in a cluster there are two types of clusters that are SINGLE-NODE OR MULTI-NODE CLUSTER.
For Refernce you can use below link for launching AWS EC2-Instance by using ansible
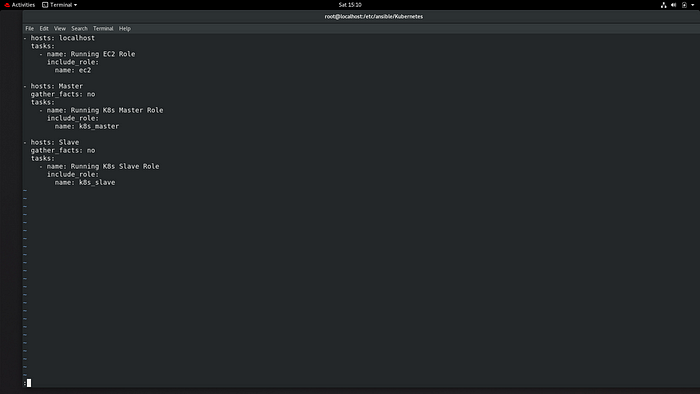
Let see how we actually create a kubernetes cluster using ansible
Prerequisites for Multi-Node Cluster
Hardware Requirements
One or more machines running one of:
Ubuntu 16.04+
Debian 9
CentOS 7
RHEL 7
Fedora 25/26 (best-effort)
HypriotOS v1.0.1+
Cloud Computing
Minimal required memory & CPU (cores)
Master node’s minimal required memory is 2GB and the worker node needs minimum is 1GB
The master node needs at least 1.5 and the worker node needs at least 0.7 cores.
Cluster setup
For Installing Setup we have to do some Environment ready for the cluster.
So First of all it requires us to do the setup. In my case I useAWS .So First we have to make Instances with 1GB RAM (Note Cluster setup requires minimum 2GB RAM. In this part we are going to see how to ignore this requirement)..
Master node configuration
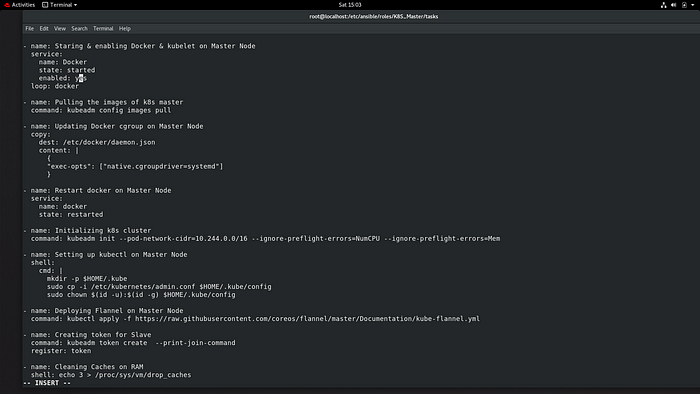
I am going to use linux ami2 , AWS not have any repository for downloading the kubernetes and other resources . For that we need to create one repo for kubernetes . so Playbook for master node :-

Adding Kubeadm repositories On Master node
Docker is an open platform for developing, shipping, and running applications. Docker enables you to separate your applications from your infrastructure so you can deliver software quickly. With Docker, you can manage your infrastructure in the same ways you manage your applications.

Now for running the service we need separate containers, either we can download it one by one manually or we can directly use the below command to pull all the necessary images from the docker hub.
kubeadm config images pull
One of the requirements is to set up the driver to systemd (by default driver is cgroup, you can check it using docker info command), by using the below command to do the same.
Open the file and paste the below paste :- vim /etc/docker/daemon.json
{
“exec-opts”: [“native.cgroupdriver=systemd”]
}
After making changes, restart the docker service
systemctl restart docker
One more requirement for networking is to have iproute-tc software, download it using yum command.
yum install iproute-tc -y
Now we also need to specify the range of IP address we want to assign to the pods or containers, also because we are doing the setup on top AWS, we might not have enough RAM or CPU in the system so we can ignore these warnings/errors using “ — ignore-preflight-errors” keyword.
Kubeadm init — pod-network-cidr=10.240.0.0/16 -ignore-preflight-errors=NumCPU — ignore-preflight-errors=Mem
Now the system is configured as a master.
Normally we have a separate client who will use the kubectl command on the master, but just for testing, we can make the master as the client/user. Now if you run the “kubectl” command, it will fail (we already have kubectl software in the system). It will fail because client should always know where master is running (the IP of the master), so client should know the port number of API, and username and password of master, so to use this cluster as a normal user, you can copy below files in the HOME location, the files contain all the credentials of master node.
mkdir -p $HOME/.kube
sudo cp -i /etc/kubernetes/admin.conf $HOME/.kube/config

sudo chown $(id -u):$(id -g) $HOME/.kube/config
Now the system is also configured as a client.
To configure some extra networks, just run the below commands for flannel configuration.
kubectl apply -f https://raw.githubusercontent.com/coreos/flannel/master/Documentation/kube-flannel.yml
To generate a token so that worker nodes can join:
kubeadm token create — print-join-command
lets see above all this command in this ansible playbook how it looks
Playbook for config Masternode
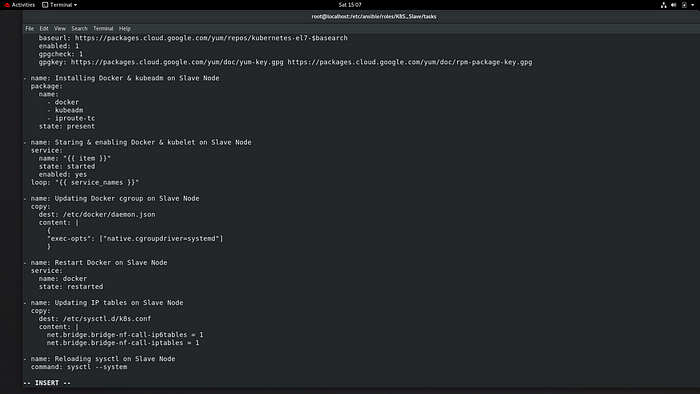
Worker node configuration
There is not such different for creating worker nodes with respective to the Master nodes we have to use same
In worker nodes also, we need to do the same setup as the master node except for a few commands like pulling docker images because it’s not required in the worker node.
sudo su — root
yum install docker -y
systemctl enable docker — now
vi /etc/yum.repos.d/kubernetes.repo
[kubernetes]
name=Kubernetes
baseurl=packages.cloud.google.com/yum/repos/kuberne..
enabled=1
gpgcheck=1
repo_gpgcheck=1
gpgkey=packages.cloud.google.com/yum/doc/yum-key.gpgpackages.cloud.google.com/yum/doc/rpm-packa..
exclude=kubelet kubeadm kubectl
yum install kubeadm — disableexcludes=Kubernetes
systemctl enable kubelet — now
vim /etc/docker/daemon.json
{
“exec-opts”: [“native.cgroupdriver=systemd”]
}
systemctl restart docker
yum install iproute-tc -y
cat <<EOF | sudo tee /etc/sysctl.d/k8s.conf
net.bridge.bridge-nf-call-ip6tables = 1
net.bridge.bridge-nf-call-iptables = 1
EOF
sudo sysctl — system
Lets see in playbook Slave node
Run ansible_playbook for setup the kubernetes cluster
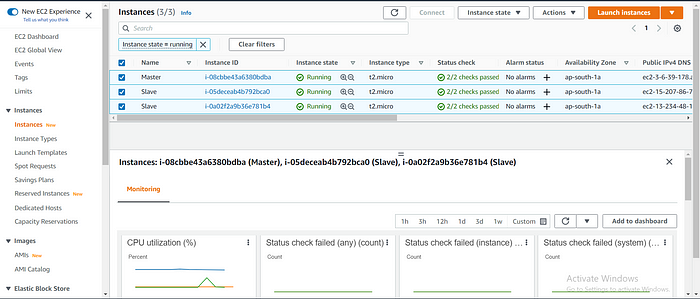
after succesfully running the playbook sucesfully you can see the instances launch sucesfully
Playbook for running the Wordpress and Expose it. (i run this playbook at the time of running Kubernetes.yml file ).
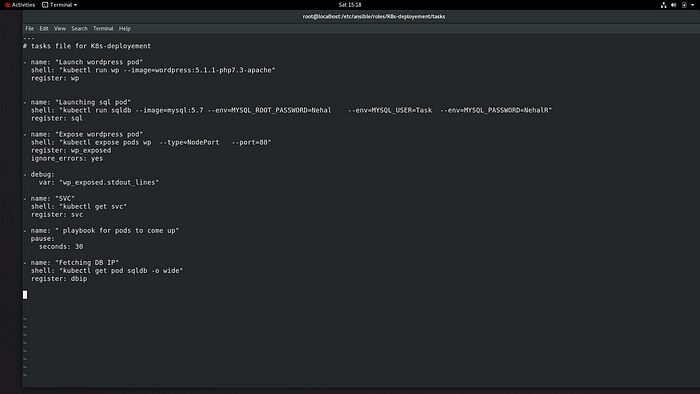
we can see the wordpress page

You can see the Kubernetes launch successfully and Wordpress
You can see this all the code in my GITHUB
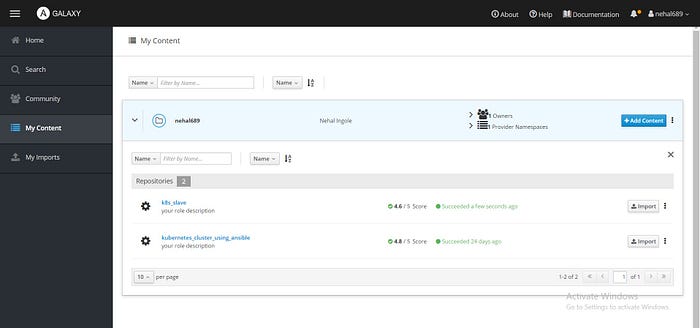
K8S_Slave
Ansible-Galaxy Roles :-
Due to some reason i am not able to push my code on Github that why i created all the file manually
Conclusion
Kubernetes emerges as a powerful tool for automating the deployment, scaling, and management of containerized applications. Hosted by the Cloud Native Computing Foundation (CNCF), Kubernetes utilizes a cluster architecture consisting of a control plane and one or more compute nodes. The cluster can be configured as a single-node or multi-node setup, offering flexibility to accommodate diverse workload requirements.
Key to Kubernetes' functionality is its ability to monitor containers and automatically restart them if they fail, ensuring high availability without human intervention. This is achieved through components like the Replicas Controller, which orchestrates the automatic launch of pods when needed.
Within the Kubernetes ecosystem, various resources play distinct roles in managing applications, including Replication Controllers (RC), ReplicaSets (RS), Pods, Services, Secrets, Persistent Volume Claims (PVC), Deployments, and more. Each resource contributes to the overall efficiency and resilience of the containerized environment.
Ultimately, Kubernetes empowers organizations to streamline their container workflows, optimize resource utilization, and deliver robust, scalable applications with ease. Whether it's a single-node setup for smaller projects or a multi-node cluster for enterprise-grade deployments, Kubernetes provides the foundation for modern, cloud-native application development.
Connect with us:
Hashnode: https://hashnode.com/@Nehal71
Twitter : https://twitter.com/IngoleNehal